Today we are going to learn about the parts of blog.Not only layout but all the part of Blog internally as well as Externally with learning widget.If You will no the parts of Blogger you will not have to face problem in Future.For example you may no what is Label??Or Something else.Thus we should know the knowledge in Depth.In this tutorials I will educate you some basic Parts Of Blogger. 
Parts of Blogger.
Every blog starts with its Dashboard.Dashboard is also home of Blogger.In Dashboard.Usually the Dashboard looks like this.Do you know there are new and old interference of blog like this.
Old Interference
This is the Old Blogger Interference.Old interference is recommended for slow connection
New Interference
New interference is also called Blogger In Draft.It looks like this.
Reason to Switch back to New Interference.
- New function get added fast at here
- It is Clean,fresh and good looking.
- The work can be done very fast at here.
- There are less error.
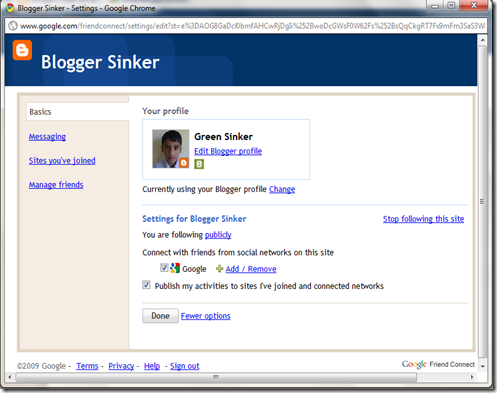
In both if you scroll down you can see a reading list.It means you have added the blog in reading list with Google Friend Connect.You also can subscribe to Blogger Sinker as reading list from here.

At reading list you can see the Updates of Blog.You can add here according to choice.The blog which you have followed will appear here.Sometimes you need to unsubscribe the blog then you should try this.
Click on manage 
- Click on setting.

- From there you can remove it from reading list by click on Stop following site
- You also can do various thing like changing profile,Messaging,Managing friends etc..
One the Below of Dashboard you can see more in old interference like 
At Tools and Resources
- AdSense : This is the process of earning money through monetizing a content.
- Blogger In Draft : It is the Blogger new,Clean Fast version.
- Google reader is the blog reader,word file reader etc.
- Webmaster Tools is the management of site in Google search result.Like from webmaster tools you can summit sitemap,Remove broken Links.
In Help resources
- Help center : The place where you can find common solution of blogger problem
- Help Group : It is Blogger Help Forum where you can ask a question related to Blogger.
- Blogger Status : It is the development activities of Blogger.
- Video Tutorials : It is collection of Blogger Tutorials at video in YouTube.
- Known Issue : The problem of Blogger which is known to us like sometimes there may be problem of Uploading photo.The problem of you may be there.Google will try to solve those harsh problem.
The Tab of Blogger.
We will detail learn about the each tab like Post,Setting,layout etc.We will stydy of Blogger of old interference.For new interference no need to worry every thing are almost same.
In Posting Tab.

You will see there tab
- New post .
- Edit post.
- Edits page.
For New post Tab
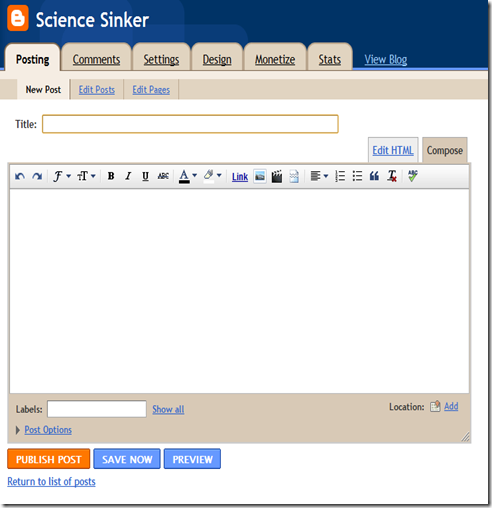
- Here you can make a new content and publish it.It looks similar to this

- In Title add your content Title.
- To ad Html code switch to Edit HTML
- From post Editor You can (According to toolbar number like undo is located 1st)
- Undo
- Redo
- Change font
- Change Font Size
- Blog the font
- Italicize the font
- Underline the font
- Strike the font
- Change color of font
- Change background color of font
- Add hyper link of font
- Add picture,Add video
- Add jump(To show summary in Homepage of Blog)
- Align the text like aligning to center
- Number the list,
- Bullets the list
- Add Blok quote
- Remove Formatting
- Word Checker : Checking the word whether it is correct or not
- In Label add your category of the content.
- In Location add the location of your post which is optional.
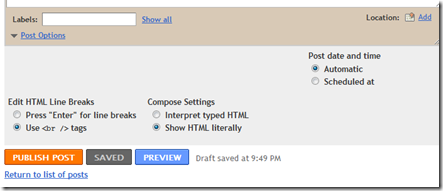
- If you expand post Option

- You can set scheduled at to set fixed time .
- If you select use <br / > tag then when you enter the post in html <br /> will be added each lines.So never enter more at the end of post other wise you will see space in Your Blog.
For Edit Page Tab

- You will see label at left side.
- You will see a list of your post.
- For adding,removing,renaming label click here.
- There you can view the post according to draft,Scheduled,Imported,Published etc.
- You can change 50 of Post per page to higher number if you want to manage more post.
- You can delete multiple post from here by ticking and deleting.
- To publish draft post tick on draft post and click on publish.
- You also can search by entering the text in search box.
For Edit page.

Crating a new page is similar to creating a new post
You can create up to 20 pages.Static page are very important because we can only create 20 page.Lets have a look in it.
You also can create add page List Gadget.
Comments Tab.

This the the place where you can see all the published comment.You also can filter spam comment from here.In awaiting modernization you will see the comment which needs to be published.You can spam or delete the comment as your wish.If you can see spam comment you need to marked as Spam.In spam tab you can see the list of spam comment.you can remove it if you have spammed it if you have mistakenly reported as spam.
Setting Tab.
In Basics

- At Blog Tools you will see the option
- Import Blog : If you want to restore backed up blog click there
- Export Blog :If you want to back Up blog click there
- Delete Blog :If you want to delete your Blog Permanently click there
- In Title you will see blog Title.
- In Description You will see the description of Blog
- In add Blog to listing select yes if your Blog will be seen in your profile
- In let search engine find your Blog select yes if you want to make blog visible in search engine.
- In Show Quick Editing on your Blog? select yes if you want to add quick post editor in Blog.
- In Show Email Post links? select yes if you want to show message icon.
- In Google Analytic Id enter the the analytic Id so that your blog will be tracked.
- In adult content set yes if your blog has adult content(Which should not be seen by children)
- In Global setting : In Select Post editor you can choose updated editor,old editor and hide compose mode.
- In Enable translation select yes and language if you want to write a blog in your national language.
In Publishing Sub Tab.

- If you want to buy custom domain or change blog address this is useful.
In Formatting Tab.

- In Show at most : select number of post which you want to show in Blog Homepage.
- In date header format select format of date which will be shown in blog.
- In archive Index Date Format :Select archive index date format which is shown in archive gadget.
- In Timestamp format to select the format of time when your post was created which is shown in Blog home page ,Post page etc.
- In Time zone select time of your country where you are living.Your blog publish time will be from here.
- In Language : Select the language of your blog.
- In showcase imaged with Light box select yes if you want image to appear with thumbnails along the button.
- In title field select yes if you want to show title field on while creating Post.
- In show Link Field set it yes if you want to add the related URl.
- In Enable float alignment your picture will have space if you set it to yes.
- In Post Template add the text or code which will appear while creating new Post.
For Comment Sub Tab

- Set comment set to show if you can to show comment form.
- In who can comment? select the option to your choice.
- In Comment form Place form placement select the option where comment form will be appear.
- In Comments for default for Posts select option to have comment published in new post.
- In backlinks select show to appear the website that links your blog.
- In comment Time Stamp format select the the date which will appear in comment when they was published.
- In comment form massage add the text which you want to appear in before the comment form.
- In comment modernization select always if you want to filter the comment to prevent spamming.
- In show word verification select yes if you want to show word verification to prevent spamming.
- In show profile images in comments select yes if you want to show the profile picture of commenters.
- In comment notification email enter or remove your ID.If you have add your email the Blogger will send all comments to your Id.
In archiving Sub tab

- In achieve frequency select the time to archive the Blog.
In Site feed Sub tab.

- In allow Blog feeds select short or long if you want to show a part of you content in Feed.
- In post feed redirect URL enter the URL like feed burner.
- In Post feed footer add the text or HTML you want to show below the feed.
In Email And Mobile Sub Tab

- If you want to show mobile view set yes in Mobile view if not set no.
- You can preview the mobile view of your Blog.
- If you want to receive post as email add your email id in email notification.
- If you want to publish your email be sending email to blogger activate Email Posting.
- If you want to add Email post you can click on add mobile.
In open id Sub Tab

- Open Id is useful.Through it you can access application in your Blogger.
In Permission Sub Tab.

- In permission tab you will see the admin
- From here you can make your Blog Private.To make private set only author of blog in who can view the Blog.
Design Tab.

In design tab there are 3 sub Tab called
- Layout
- Edit Html
- Template Designer
- In Layout you can add,remove widget you can learn more from here.
- In edit Html you can customize the template how it looks.
- In Template Designer you can customize blog with Live preview.
Monetize Tab.

- This the The tab where we will monetize the blog.After getting approved you can see the earning of your Blog.
- In AdSense for feed you can monetize your Feed.
Stat tab

- In Stat tab you can see your Blog Visitor,Traffic etc. in Detail.You can see the country with map who visited.
Subscribe for free
Thanks for visiting Blogger Rounder.We can subscribe to Blogger Rounder's by RSS feed or email updates.


0 comments on "Understanding the part of Blogger with Details.":
Post a Comment
We Love To Hear Comments from You.Comments are Welcome.You can comment here regarding this Post.If it is not related with the post you can ask a question by Contacting Us.Before Comment Please Subscribe To our RSS or email updates.Publishing Spam Comment is Not allowed.If you want to Add Code then Please Encode it.
Simple Tags like <a> ,<strong>,<b>,<em> and <i> are allowed for preventing spam